
Recently I joined forces with a few other bloggers to make up a blogging team for Simple Sew patterns. How exciting! I will be sharing some tutorials for their patterns. I hope that you will find them useful!
First up what do you think of the fabric I chose?

Beautiful, right? It’s called ‘Wild and Free Luminous Field’ – from Whitetree Fabrics. Click the logo below to be taken to the page on their website to buy!
![]()
Now on to the tutorial. I’m just going to share the cap sleeves part today – I will share photos of the entire finished dress ASAP. Head over to Laura After Midnight’s blog if you want a detailed tutorial of the whole dress – minus the cap sleeves!
There are no instructions for the cap sleeves in the pattern. So this is the way that I did it – I am sure there are more ways to insert them; in fact I came up with a few – but this is my preferred method. Please READ THROUGH all the instructions before starting! If you are stumped by anything, just leave a comment and I will help!
You will be using the sleeve type marked ‘Option C’ on the pattern paper. If tracing, ensure that you mark the notch, and where the gathering marks are.
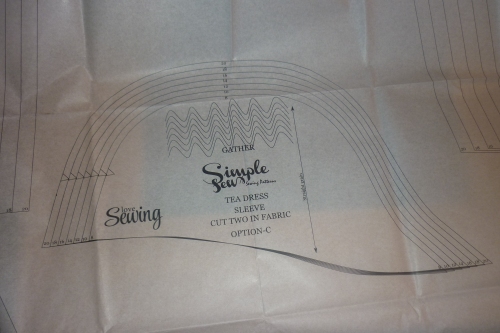
Then cut the sleeves out of your fabric, transferring the marks as well. I use a pen to make a little dash where the wiggly gather symbol starts and ends; that’s all you need.

You may notice that the sleeve does not go all the way round the armscye. You will be left with a gap of a few inches, at the front.
So, to fill that gap, we can use some bias binding. I’m quite a fan of bias binding; it’s so versatile and pretty easy to use.
You don’t need an awful lot; I used 75cm. (I also bound the shoulder seams with it.) You can either make your own out of the fabric you’re using (or any other fabric), or buy pre-made. There are plenty of tutorials online explaining how to make your own!
I think it’s best to hem the sleeves with bias binding, because of the way they’re curved. So before sewing the sleeves to the bodice, attach the bias binding to the hems of the sleeves (this is the edge with no notch on):
- Open out your bias binding and pin to the WRONG side of the sleeve.

2. Sew together along the crease line.
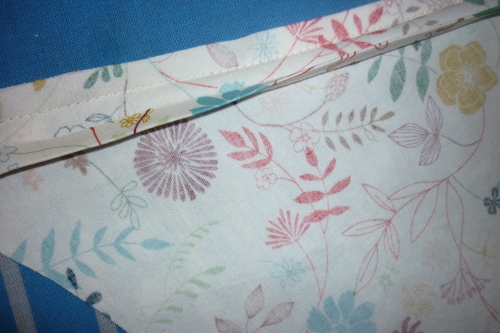
3. Flip the bias binding over to the RIGHT side, and, still on the RIGHT side, sew in place close to the inner edge of the bias binding.


Once you’ve done this on both sleeves they should look like this (right and wrong sides):


In terms of the construction of the dress so far, you should be up to step 5 or 6 (it doesn’t matter if you have sewn the bodice to the skirt panels or not, which is step 6). You should have:
- Sewn in the four darts
- Sewn the shoulder seams
- Attached the facing

So we are inserting the sleeves BEFORE sewing the side seams.
First you need to gather the small section at the sleeve head, between the marks:
- Set your sewing machine to the longest stitch length.
- Sew two lines of stitching about 3/8″ and 5/8″ away from the raw edge, between the marks.
- Pull the bobbin threads of the stitching, to create lots of little gathers. You can pull them quite tight as you will be creating some sweet little gathers at the top of the sleeve. You’ll spread them out a little later to fit the armsyce accurately.

Now you’re ready to insert the sleeves.
Take one sleeve and lay it RIGHT SIDES TOGETHER on top of the corresponding armscye of the bodice, matching the single notch.
Pin the sleeve to the bodice from the notch to the edge.

Then pin the opposite side; start at the end, which will lay right up to the side seam. Pin until you get to the gathered section.

Pull the gathers until the sleeve piece fits snugly in place, and pin the remaining gap.
Now you’re ready to sew. Starting from the edge where the sleeve and bodice meet (forget about extra few inches for now), sew with a 3/8″ seam allowance all the way to the end. Take your time to ensure there are no puckers!

Wa-hey; that’s one sleeve inserted. Now repeat with the other!
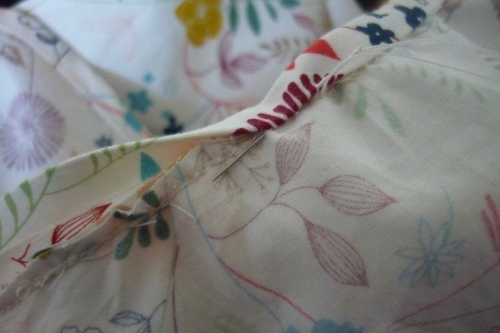
Now to finish off, we just need to tidy up those few inches. Take your bias binding – you will attach it to the seam allowance in a slightly different way to how you attached it to the hem of the sleeves.
- Open out your bias binding and pin to the RIGHT side of the sleeve, with a 5/8″ SEAM ALLOWANCE. (Don’t put the bias binding right up to the edge of the fabric, or you’ll risk the armsyce being too tight!) Sew along the crease line of the bias binding. Note: you can either bind just the gap of a few inches [just stop when you’re past the gap], or bind the seam allowance of the sleeve too. I chose to bind the seam allowance as I like the finish inside.

2. Trim the seam allowance of the bodice/sleeve flush against the bias binding.
3. Flip the bias binding over to the WRONG side, and EITHER slipstitch (by hand) the bias binding down, OR stitch in the ditch (from the RIGHT side!) [I slipstitch!]
Give the sleeve/bodice a good press, and unpick any visible gathering stitches from the sleeve head.
Ta-dah, that’s it! 🙂
This is what the inside will look like if you sewed the bias binding all the way round like I did:

Neat, huh?
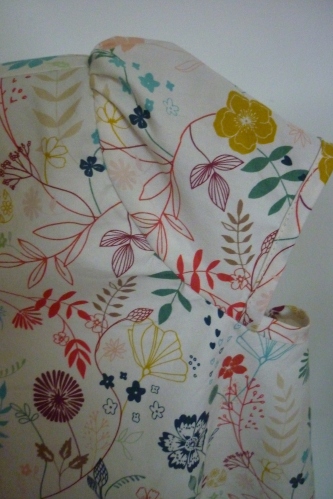
And this is what the bodice looks like on! (Excuse the towel on my head; I haven’t dyed my hair purple!!)

I hope that this made sense – please do let me know if something’s confusing, and I will answer any questions you have if you’re making the dress.
Beth x


Got very confused on how to fit these sleeves as no instructions. I ended up cutting them out slightly larger than the pattern and fully fitting them to the armhole crossing over the ends at the point where they met the side seam. I did wonder why my first attempt resulted in a tight sleeve but I have chunky upper arms. Now I have seen your explanation I know what to do next time. What a pity the instructions are not included in the pattern.
LikeLike
Pingback: English Tea Dress – Naomi Sews
Lovely fabric, really unusual and it works well as a blouse. The binding for the armholes is a fabulous finishing touch and so well executed.
LikeLiked by 1 person
Thank you so much! What a lovely comment 🙂
LikeLiked by 1 person
I love cap sleeves. This is very pretty. Thanks for the tutorial!
LikeLiked by 1 person
Thank you and you’re welcome! I’m a fan of cap sleeves too 🙂
LikeLiked by 1 person
It is so hard to write good instructions, so well done. And a beautiful fabric too.
LikeLiked by 1 person
Thank you! Yes it’s very different when you can’t physically show what you’re saying!
LikeLike
Great tutorial Beth! Lovely fabric too.
LikeLiked by 1 person
Thank you 🙂
LikeLike
Hi Beth, I’ve been having trouble with the sleeve, so am going to try this method. Just wondered though, I can see how the notches meet at the front, but does the sleeve go all of the way around and down to the side seam on the back? Do you have a picture at all? When I did this it didn’t sit right, but perhaps I need to gather it more.
LikeLiked by 1 person
Hi Claire. Yes, the sleeve goes right the way to the edge of the side seam. Sorry I don’t have any more photos! You do need to gather it a lot – the gathering stitches aren’t just for easing the sleeve in, like they sometimes are – you actually create gathers. I hope this helps and you get your head around it but do ask again if it still doesn’t make sense!
LikeLike
Very nice fabric! Good job with the tutorial!
LikeLiked by 1 person
Thanks, Linda!
LikeLiked by 1 person
What an exciting new venture for you! Very clear tutorial!
LikeLiked by 1 person
Thank you so much. Yeah it’s fun! 🙂
LikeLiked by 1 person
Cute fabric Beth! I shall be looking out for the finished photos 🙂 x
LikeLiked by 1 person
Thank you 🙂 x
LikeLike
Awesome tutorial Beth! It neve occured to me that armhole seam could be bound using bias binding so simply. Thanks for sharing and cant wait to see finished dress.😃
LikeLiked by 1 person
Thank you! It might have occurred to you if you sat and thought about the best way for a while like I did!
LikeLiked by 1 person
Yes, beautiful fabric and I really like the way you’ve constructed this; easy and produces such a nice finish.
LikeLiked by 1 person
Thanks! I could have just turned over the edge once and sewn, but if you’re going to make your own it should be that bit more special than a RTW dress, shouldn’t it?
LikeLiked by 1 person
Yes, absolutely!
LikeLiked by 1 person
Congrats on your new role 🙂 Lovely fabric choice, look forward to seeing the finished article.
LikeLiked by 1 person
Thank you! So am I! 🙂
LikeLiked by 1 person
That is the prettiest fabric. It looks like a very easy to follow tutorial and your sewing is SO neat!
LikeLiked by 1 person
Thank you so much. I don’t buy designer fabric so this was such a luxury for me – it’s gorgeous. So lovely to sew!
LikeLike