
I fell in love with this pattern the first time I saw it. I have a soft spot for peter pan collars! And I’m happy to say I also love the finished garment now I’ve sewn one up!

It has a beautiful slightly large peter pan collar, slightly capped sleeves, and buttons down the back. There aren’t any darts to get flummoxed over; it’s quite a straightforward pattern. With this tutorial we’ll have you sewing one up for yourself in no time!

I made a size 8, and needed less than 1m of fabric (Liberty cotton lawn, which I recommend due to the lovely drape).
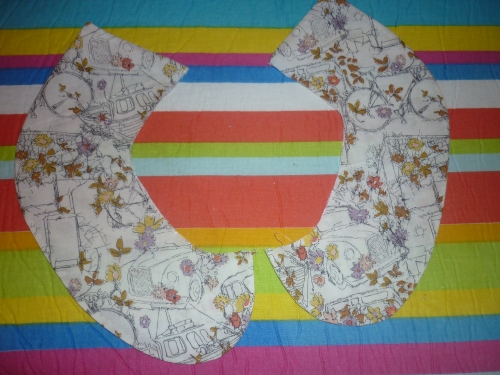
First off, trace and cut your pattern pieces; there are just three! (Yes, I took a gamble and cut down to a size 8; I actually NEVER usually cut patterns but I was too excited!!)

With your fabric on the fold, cut your pieces as follows: top front cut one on the fold, top back cut two, collar cut four. (I cut two collar pieces, then removed the collar piece; pinned and cut two more).
Iron interfacing on to the wrong sides of two collar pieces (these will be on the reverse/underside of the collar). Pick an interfacing that is the same or lighter weight than your fabric (I used a lightweight one).

With right sides together, sew around the outside edges of each pair of collar pieces with a 1cm seam allowance, leaving the inner curve open. Clip and trim the edges; or cheat and use pinking shears!

Turn right side out and give each piece a really good press, rolling the seams slightly to the underside (which is the interfaced side). Set these aside.
Sew your top pieces together at the shoulders (two back pieces to the shoulders of the front piece) right sides together, with a 1cm seam allowance. Finish these seams in your desired way (I overcast them) and press either open or towards the back.

Lay the top right side up. Mark the centre front of the top. Place the collar pieces right side up (interfaced sides down) on top, matching raw edges. You want the collar to meet in the middle and slightly overlap about 1cm; this is so that when you sew the collar to the top with your 1cm seam allowance the collar will meet exactly in the middle – without crossing over and without having too much or a gap.
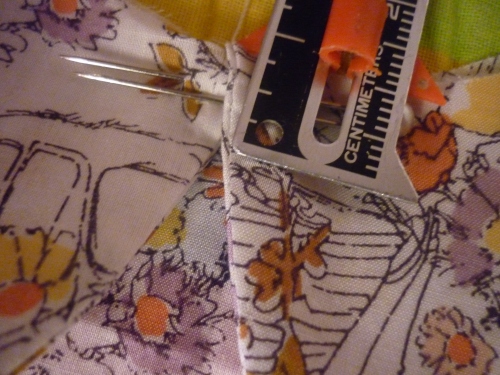
Pin in place and tack.

Sew the back pieces to the front piece at the sides. (With right sides together, so straight down with a 1cm seam allowance. Finish the seams in your desired way.)
Now you’re going to hem the sides of the back pieces. Fold and press over 5mm, then to the notch (20mm). Sew close to the inner folded edge.

Hem the bottom of the top (you can do this last but I just did it at this point as the fabric was fraying!) Turn the hem up 5mm then 1cm and sew close to the inner fold.

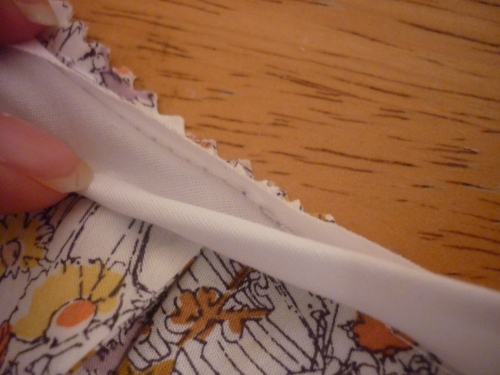
Now, bias binding. Make some or buy some! I made some 1” wide single fold (you could go smaller). In hindsight I should have made it in the same fabric, but I didn’t want to cut diagonally into it and waste it!!

Sew bias binding round the neckline, using a 1cm seam allowance, right sides together.

When you get to the ends, tuck the ends of the bias binding in to create neat ends – and sew right to the edge.

Trim the curves, and cut notches. Or cheat and use pinking shears like me.
Flip the bias binding to the wrong side of the top, keeping the other edge of it folded. Sew close to that fold. This hides entire bias binding underneath the top. You could sew it so that it shows around the edge; like I did with the armholes. It’s personal preference.
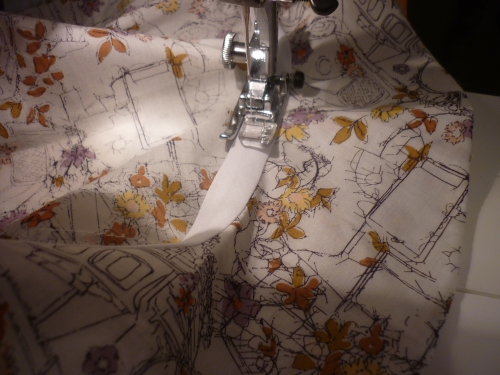
Sew bias binding to the armholes in a similar way. Leave a gap of a few inches and a few inches of bias binding either side, so that you can join it in the middle. It’s really difficult for me to describe how to do this in text – if you need any help with bias binding there are some good videos on YouTube!!

Now, I tried to sew this bias binding the same way as I did the neckline but it didn’t work; it would have created too many puckers. So I sewed it so that the bias binding was folded a further time, then I handstitched it in place on the inside. This is where I wanted bias binding of the same fabric as the white doesn’t work very well… oh well, it could be worse!

Now on to the buttonholes. Mark these on to the left side of the back piece – starting 5mm from the top, and 1” in. Mark them every 10cm. Sew the buttonholes with your machine.
Use a pen or pin to mark through the centre of each buttonhole; this will be where you sew your buttons.

Sew your buttons on. I used some vintage buttons I’ve had stashed for far too long. They’re mismatched but I love them!

Give it all a good press… and that’s it!!
Any questions, do ask.
Now here are a few more photos of my blouse. It’s sooo comfy, I really do love it.


Beth x


Very Pretty!! 😀
LikeLike
Thank you! 😊
LikeLike
Oh yes, I do love that fabric – what an economical pattern to use expensive fabrics for.
LikeLiked by 2 people
Yes definitely, it used such a small amount of fabric! Smaller than some kids clothes! 🙂
LikeLiked by 2 people
Beth it looks lovely. I also love. The fabric a lot made myself a modified Lottie Blouse with it and I keep wearing it a lot.
LikeLiked by 2 people
Ooh I bet that’s really nice. Thank you!
LikeLike
Lovely blouse, it looks like it fits you so well and your fabric is gorgeous and works so well for this top.
LikeLiked by 2 people
Thanks Lynsey, yes it does fit nicely with no alterations and it’s so comfy!
LikeLike